0 准备
- 虚拟机环境:Cent0S7
IP地址:
192.168.0.103- 查看ip的命令
ip addr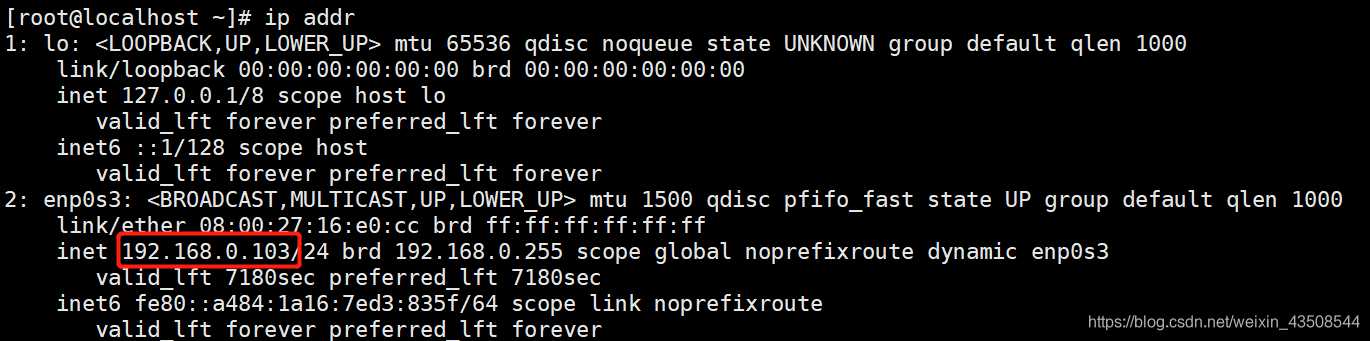
- 本次安装只在同一台服务器中进行操作,即
tracker和storage在同一台服务器中
1 FastDFS安装
1.1 下载地址
- https://github.com/happyfish100/FastDFS
- 本次使用的是
FastDFS_v5.05.tar.gz
1.2 安装环境
1.2.1 安装gcc
- 安装FastDFS需要先将官网下载的源码进行编译,编译依赖
gcc环境,如果没有gcc环境,需要安装gcc
yum install gcc-c++1.2.2 安装libevent
- FastDFS依赖libevent库
yum -y install libevent1.2.3 安装libfastcommon
- libfastcommon是FastDFS官方提供的,libfastcommon包含了FastDFS运行所需要的一些基础库
- 可以使用xftp将
libfastcommonV1.0.7.tar.gz拷贝至/usr/local/下
cd /usr/local
tar -zxvf libfastcommonV1.0.7.tar.gz
cd libfastcommon-1.0.7
./make.sh
./make.sh install
注意
- libfastcommon安装好后会自动将库文件拷贝至
/usr/lib64下,由于FastDFS程序引用/usr/lib目录所以需要将/usr/lib64下的库文件libfastcommon.so拷贝至/usr/lib下

cp /usr/lib64/libfastcommon.so /usr/lib/1.3 tracker的安装与配置
1.3.1 安装
- 将
FastDFS_v5.05.tar.gz拷贝至/usr/local/下,解压编译安装
tar -zxvf FastDFS_v5.05.tar.gz
cd FastDFS
./make.sh
./make.sh install- 安装成功后,进入
/usr/local/FastDFS/conf,将该目录下的文件拷贝到/etc/fdfs目录下

1.3.2 配置
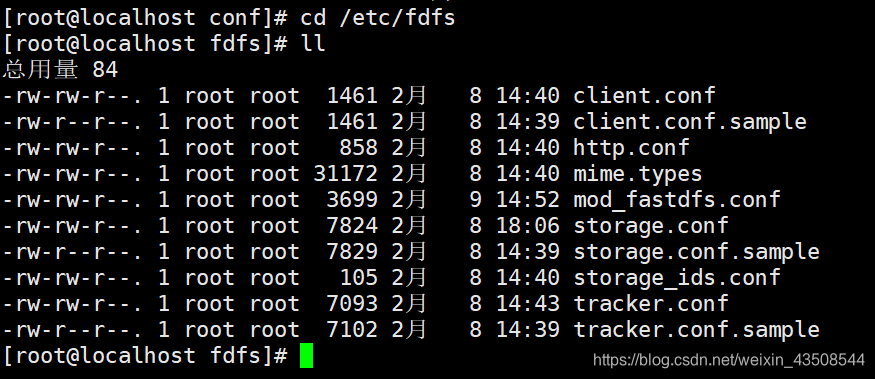
- 安装成功后进入
/etc/fdfs目录
- 拷贝一份新的tracker配置文件
cp tracker.conf.sample tracker.conf- 修改
tracker.conf
vim tracker.conf- <font color="red">base_path=/home/yuqing/fastdfs 改为 base_path=/home/fastdfs</font>
- <font color="red">配置http端口:http.server_port=80</font>


1.3.3 tracker 启动命令
/usr/bin/fdfs_trackerd /etc/fdfs/tracker.conf restart- 查看tracker是否成功启动
ps -aux | grep fdfs
1.4 storage的安装与配置
1.4.1 安装
- 环境见1.2
- 软件安装见1.3.1
1.4.2 配置
- 安装成功后进入
/etc/fdfs目录 - 拷贝一份新的storage配置文件
cp storage.conf.sample storage.conf- 修改
tracker.conf
vim tracker.conf- <font color="red">base_path=/home/yuqing/fastdfs 改为 base_path=/home/fastdfs</font>
- <font color="red">store_path0=/home/yuqing/fastdfs 改为 store_path0=/home/fastdfs/fdfs_storage</font>(如果有多个挂载磁盘则定义多个store_path,如下)
store_path0=/home/fastdfs/fdfs_storage
#store_path1=.....
#store_path2=......- <font color="red">配置tracker服务器IP:tracker_server=192.168.0.103:22122</font>(根据你的tracker所在的服务器ip进行修改,如果有多个则配置多个tracker_server)
tracker_server=192.168.0.103:22122
#tracker_server=192.168.0.104:22122- <font color="red">配置http端口:http.server_port=80</font>
1.4.3 启动
/usr/bin/fdfs_storaged /etc/fdfs/storage.conf restart
- 查看tracker和storage是否建立成功
netstat -antp | grep trackerd
netstat -antp | grep storage
2 上传文件测试
- 修改
/etc/fdfs/client.conf
base_path=/home/fastdfs #原先:base_path=/home/yuqing/fastdfs
tracker_server=192.168.0.103:22122 #如果有多个就配置配置多个 原先:tracker_server=192.168.0.197:22122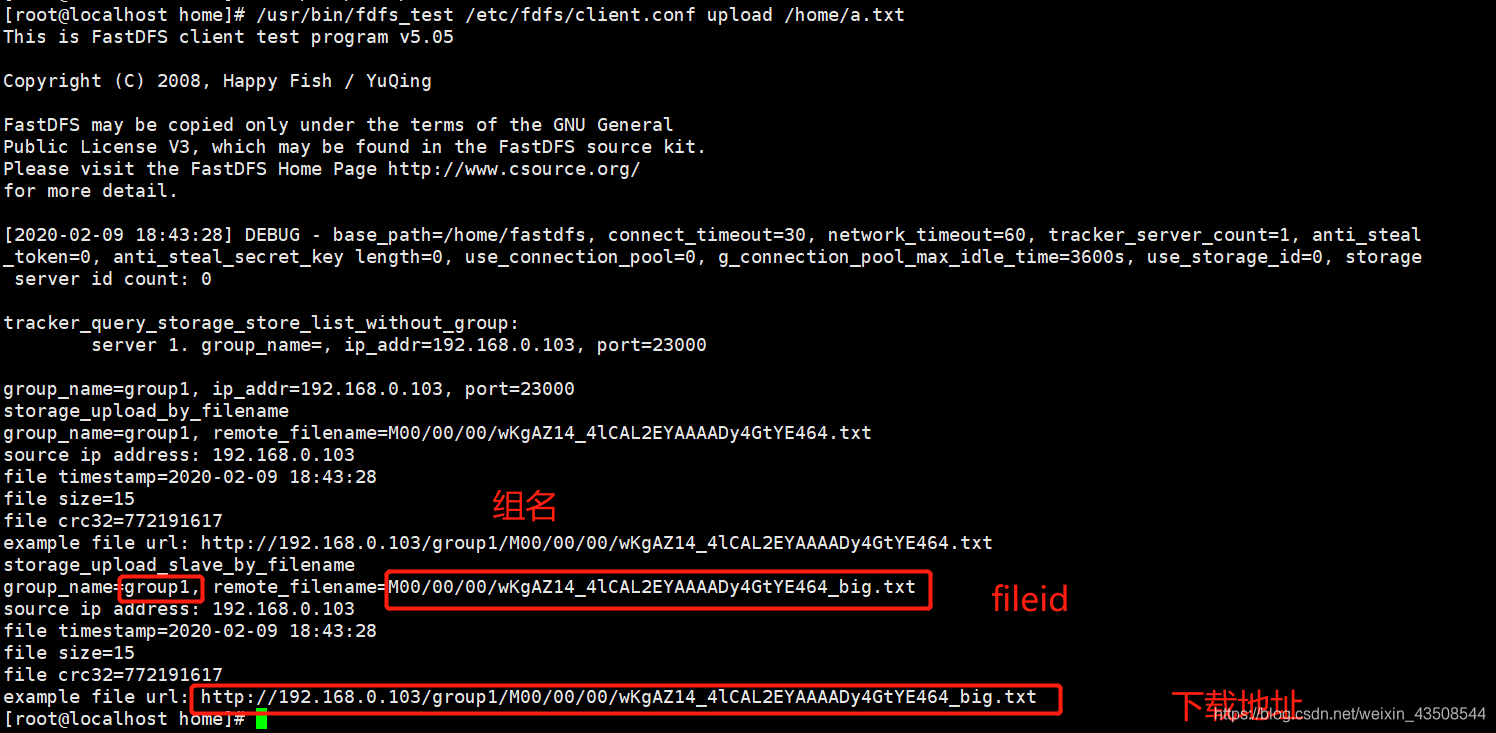
http.tracker_server_port=80 #端口- 进入
/usr/bin/目录,上传文件/home/a.txt,执行
/usr/bin/fdfs_test /etc/fdfs/client.conf upload /home/a.txt- 执行后的输出日志
3 上传文件java代码
- 配置文件
config/fastdfs-client.properties
#http连接超时时间
fastdfs.connect_timeout_in_seconds = 5

#tracker与storage网络通信超时时间
fastdfs.network_timeout_in_seconds = 30

#字符编码
fastdfs.charset = UTF-8

#tracker服务器地址,多个地址中间用英文逗号分隔
fastdfs.tracker_servers = 192.168.0.103:22122
@SpringBootTest
@RunWith(SpringRunner.class)
public class TestFastDFS {
//上传测试
@Test
public void testUpload() {
//加载fasddfs-client.properties配置文件
try {
ClientGlobal.initByProperties("config/fastdfs-client.properties");
//定义TrackClient,用于请求TrackerServer
TrackerClient trackerClient = new TrackerClient();
//连接tracker
TrackerServer trackerServer = trackerClient.getConnection();
//获取storage
StorageServer storeStorageServer = trackerClient.getStoreStorage(trackerServer);
//创建storageClient 通过tracker server 和 storage server 获得storageClient
StorageClient1 storageClient1 = new StorageClient1(trackerServer, storeStorageServer);
//向storage服务器上传文件
//本地文件的路径
String filePath = "D:/prac_project/fdfs_test_upload.jpg";
//上传成功后拿到文件id
String fileId = storageClient1.upload_file1(filePath, "png", null);
System.out.println(fileId);//group1/M00/00/00/wKgAZ14_pb6ASZHeAAKBN9Um430128.png
} catch (IOException e) {
e.printStackTrace();
} catch (MyException e) {
e.printStackTrace();
}
}
//下载测试
@Test
public void testDownload() {
try {
ClientGlobal.initByProperties("config/fastdfs-client.properties");
//定义TrackClient,用于请求TrackerServer
TrackerClient trackerClient = new TrackerClient();
//连接tracker
TrackerServer trackerServer = trackerClient.getConnection();
//获取storage
StorageServer storeStorageServer = trackerClient.getStoreStorage(trackerServer);
//创建storageClient 通过tracker server 和 storage server 获得storageClient
StorageClient1 storageClient1 = new StorageClient1(trackerServer, storeStorageServer);
//下载文件
//文件id
byte[] bytes = storageClient1.download_file1("group1/M00/00/00/wKgAZ14_pb6ASZHeAAKBN9Um430128.png");
//使用输出流保存文件
FileOutputStream fileOutputStream = new FileOutputStream(new File("d:/prac_project/day8_fdfs/test_download.png"));
fileOutputStream.write(bytes);
} catch (IOException e) {
e.printStackTrace();
} catch (MyException e) {
e.printStackTrace();
}
}
//文件查询
@Test
public void testQueryFile() {
try {
ClientGlobal.initByProperties("config/fastdfs-client.properties");
TrackerClient trackerClient = new TrackerClient();
TrackerServer trackerServer = trackerClient.getConnection();
StorageServer storageServer = null;
StorageClient storageClient = new StorageClient(trackerServer, storageServer);
FileInfo fileInfo = storageClient.query_file_info("group1", "M00/00/00/wKgAZ14_pb6ASZHeAAKBN9Um430128.png");
System.out.println(fileInfo);
} catch (IOException e) {
e.printStackTrace();
} catch (MyException e) {
e.printStackTrace();
}
}
}参考:
One comment
反驳对手观点时需更注重逻辑严密性。