一、Spring配置详解
1.1 Bean元素
- 将
User对象交个Spring容器管理 bean元素:使用该元素描述需要spring容器管理的对象name:给被管理的对象起个名字,获得对象时根据该名称获得对象。
- 可以重复,可以使用特殊字符。
- class:被管理对象的完整类名。
- id:与name属性一样
<bean name="user" class="a_hello.User"></bean>1.2 Bean元素进阶
scopesingleton(默认):单例对象,被标识为单例的对象在Spring容器中只会存在一个实例prototype:多例原型,被标识为多例对象,每次在获得才会创建.每次创建都是新的对象。整合struts2时,ActionBean必须配置为多例的.request:web环境下.对象与request生命周期一致.session:web环境下,对象与session生命周期一致.
生命周期属性
init-method:配置一个方法作为生命周期初始化方法。spring会在对象创建之后立即调用.destroy-method:配置一个方法作为生命周期的销毁方法。spring容器在关闭并销毁所有容器中的对象之前调用.
<bean name="user" class="a_hello.User" scope="prototype"
        init-method="init" destroy-method="destroy"></bean>
二、Spring容器创建对象的方式
配置文件
<?xml version="1.0" encoding="UTF-8"?>
<beans xmlns:xsi="http://www.w3.org/2001/XMLSchema-instance"
    xmlns="http://www.springframework.org/schema/beans"
    xsi:schemaLocation="http://www.springframework.org/schema/beans
            http://www.springframework.org/schema/beans/spring-beans-4.3.xsd ">

    <!-- 管理对象 -->
    <!-- spring容器创建对象的方式 3 种 -->
    <!-- 1.构造器创建 -->
    <bean name="user" class="domain.User"></bean>

    <!-- 2.静态工厂方式:工厂类中提供静态方法 -->
    <!-- 调用UserFactory的getUser方法创建名为user1的对象,并放入容器 -->
    <bean name="user1" class="b_create.Factory" factory-method="getUser" ></bean>

    <!-- 3.工厂方法方式:工厂类中提供普通方法 -->
    <!-- 先要有factory对象,才能调用普通方法 -->
    <bean name="factory" class="b_create.Factory"></bean>
    <bean name="user2" factory-method="newUser" factory-bean="factory"></bean>
</beans>
测试类
package b_create;

import domain.User;

public class Factory {
    // 提供一个静态方法,获得对象
    public static User getUser() {
        System.out.println("static Factory");
        return new User();
    }

    // 提供普通方法
    public User newUser() {
        System.out.println("Factory method");
        return new User();
    }
}
2.1 构造器创建
- 配置文件:
<bean name="user" class="domain.User"></bean>
2.2 静态工厂方式
- 工厂类中提供静态方法,用以返回对象
重要属性:
factory-method,赋予静态方法名- 配置文件:
<bean name="user1" class="b_create.Factory" factory-method="getUser" ></bean>
- 配置文件:
2.3 工厂方法方式
- 工厂类中提供普通方法,用以返回对象
重要步骤:首先需要管理
factory对象<!-- 3.工厂方法方式:工厂类中提供普通方法 --> <!-- 管理factory对象 --> <bean name="factory" class="b_create.Factory"></bean> <bean name="user2" factory-method="newUser" factory-bean="factory"></bean>
2.0 spring的分模块配置
<!-- 导入其他模块的配置文件 -->
<import resource="b_create/applicationContext.xml"/>
三、Spring属性注入
3.1 注入方式
3.1.1 set方法注入
propertyname:属性名value:基本类型,值ref:注入的对象name(引用)
    <!-- 1.set注入 -->
    <bean name="user" class="domain.User">
        <!-- property属性
                |- name: 属性名
                |- value: 基本类型 值
                |- ref: 注入的对象name
         -->
        <property name="name" value="lucy"></property>
        <property name="age" value="19"></property>
        <property name="car" ref="car1"></property>
    </bean>

    <bean name="car1" class="domain.Car" >
        <property name="name" value="兰博基尼"></property>
        <property name="color" value="黄色"></property>
    </bean>
3.1.2 构造函数注入
constructor-argtype:参数类型 - 完整类型value:普通类型,值ref:引用类型,值-对象名index:参数的索引
    <!-- 2.构造器注入 -->
    <bean name="user1" class="domain.User">
        <!-- 构造器参数:
                |— type:参数类型 - 完整类型
                |- value:普通类型值
                |- ref:引用类型值 对象name
                |- index:参数的索引
         -->
        <constructor-arg type="String" value="tom" index="1" ></constructor-arg>
        <constructor-arg type="Integer" value="20"></constructor-arg>
    </bean>
3.1.3 p命名空间注入
<!-- 3.p命名空间注入 - 了解 -->
    <bean name="user2" class="domain.User"
        p:age="23" p:name="jack" p:car-ref="car1">
    </bean>
3.1.4 spel注入
<!-- 4.表达式spel注入 - 了解 -->
    <bean name="user3" class="domain.User">
        <property name="name" value="#{user1.name}"></property>
        <property name="age" value="#{user.age}"></property>
    </bean>
3.2 复杂类型注入
3.2.1 数组
propertyarrayvalue
        <!-- array类型和list完全一样 -->
        <!-- <property name="arr" value="lucy"></property> -->
        <property name="arr">
            <array>
                <value>lucy</value>
                <value>tom</value>
            </array>
        </property>
3.2.2 List
propertylistvalue
        <!-- list类型 -->
        <!-- 集合中只有一个值 -->
        <!-- <property name="list" value="haha" ></property> -->
        <!-- 集合中多个值 -->
        <property name="list">
            <list>
                <value>haha</value>
                <value>haha</value>
                <value>haha</value>
                <!-- <ref bean=""/> -->
            </list>
        </property>
3.2.3 Map
propertymapentrykeyvalue/value-ref
        <!-- map类型 -->
        <property name="map">
            <map>
                <entry key="user1" value-ref="user"></entry>
            </map>
        </property>
3.2.4 Properties
propertypropspropkey
        <!-- properties类型,泛型全都是String -->
        <property name="pros">
            <props>
                <prop key="driver">com.mysql.jdbc.Driver</prop>
            </props>
        </property>
四、使用注解配置Spring
4.1 步骤
4.1.1 导包
4 + 2 + 1
4
spring-beans-4.3.9.RELEASE.jarspring-context-4.3.9.RELEASE.jarspring-core-4.3.9.RELEASE.jarspring-expression-4.3.9.RELEASE.jar
2
com.springsource.org.apache.commons.logging-1.1.1.jarcom.springsource.org.apache.log4j-1.2.15.jar
1
spring-aop-4.3.9.RELEASE.jar
4.1.2 为主配置文件引入新的命名空间(约束)
context
4.1.3 开启使用注解代替配置文件
    <!-- 开启注解扫描
         base-package: 指定注解扫描的包
                 包下面所有的后代包都会被扫描
     -->
    <context:component-scan base-package="d_annotation"></context:component-scan>
4.1.4 在类中使用注解完成配置
4.2 将对象注册到容器
@Component("user")@Service("user"):service层@Controller("user"):web层@Repository("user"):dao层
4.3 修改对象的作用范围
@Scope(scopeName="prototype")
4.4 值类型的注入
@Value("tom"):建议放在set方法前
4.5 引用类型注入
4.5.1 自动装配
@Autowired:如果匹配多个类型一致的对象,将无法选择具体注入哪一个对象。@Qualifier("car2"):使用该注解,告诉容器自动装配那个名称的对象,解决上面的问题。
4.5.2 手动注入
- `@Resource(name="car"):指定注入那个名称的对象
4.6 初始化、销毁方法
4.6.1 初始化方法
@PostConstruct:在对象被创建后调用,相当于init-method
4.6.2 销毁方法
@PreDestroy:在销毁之前调用,相当于destroy-method
package d_annotation;

import java.util.List;
import java.util.Map;
import java.util.Properties;

import javax.annotation.PostConstruct;
import javax.annotation.PreDestroy;
import javax.annotation.Resource;

import org.springframework.beans.factory.annotation.Autowired;
import org.springframework.beans.factory.annotation.Qualifier;
import org.springframework.beans.factory.annotation.Value;
import org.springframework.context.annotation.Scope;
import org.springframework.stereotype.Component;
import org.springframework.stereotype.Controller;
import org.springframework.stereotype.Repository;
import org.springframework.stereotype.Service;

@Component("user") // 默认添加名字 user - 类名首字母小写
//    @Controller // web
//    @Service    // service
//    @Repository // dao
@Scope(scopeName = "prototype")
public class User {
    @Value("zhangsan")
    private String name;
    @Value("10")
    private Integer age;
//    @Autowired // 自动装配
//    @Qualifier("car1")

    @Resource(name = "car1")
    private Car car;

    // 为了实例化对象后,做的一些初始化动作
    @PostConstruct // init-method
    public void haha() {
        System.out.println("haha");
    }

    // 为了在对象销毁之前执行的动作
    @PreDestroy // destroy-method
    public void destroy() {
        System.out.println("User destroy");
    }

    public User(Integer age, String name) {
        super();
        System.out.println("age --- name");
        this.name = name;
        this.age = age;
    }

    public User(String name, Integer age) {
        super();
        System.out.println("name --- age");
        this.name = name;
        this.age = age;
    }

    public Car getCar() {
        return car;
    }

    public void setCar(Car car) {
        this.car = car;
    }

    public String getName() {
        return name;
    }
//    @Value("zhangsan") // 符合属性封装的特点
    public void setName(String name) {
        this.name = name;
    }

    public Integer getAge() {
        return age;
    }

    public void setAge(Integer age) {
        this.age = age;
    }

    public User() {
        super();
        System.out.println("User init");
    }

    @Override
    public String toString() {
        return "User [name=" + name + ", age=" + age + ", car=" + car + "]";
    }
}
//---------------------------------------
package d_annotation;

import org.springframework.beans.factory.annotation.Value;
import org.springframework.stereotype.Component;

@Component
public class Car {
    @Value("玛莎拉蒂")
    private String name;
    @Value("绿色")
    private String color;
    public String getName() {
        return name;
    }
    public void setName(String name) {
        this.name = name;
    }
    public String getColor() {
        return color;
    }
    public void setColor(String color) {
        this.color = color;
    }
    @Override
    public String toString() {
        return "Car [name=" + name + ", color=" + color + "]";
    }
    public Car() {
        super();
    }
}
五、Spring与JUnit整合测试
5.1 导包
- 4 + 2 + aop + test
5.2 配置注解
- 将junit和 spring 容器进行整合:
@RunWith(SpringJUnit4ClassRunner.class) - 指定容器对应的配置文件:
@ContextConfiguration(locations = "classpath:e_junit/applicationContext.xml")
package e_junit;

import org.junit.Test;
import org.junit.runner.RunWith;
import org.springframework.beans.factory.annotation.Autowired;
import org.springframework.test.context.ContextConfiguration;
import org.springframework.test.context.junit4.SpringJUnit4ClassRunner;

// 将junit和 spring 容器进行整合
@RunWith(SpringJUnit4ClassRunner.class)
// 指定容器对应的配置文件
@ContextConfiguration(locations = "classpath:e_junit/applicationContext.xml")
public class UserDaoTest {
    @Autowired
    UserDao ud;
    @Autowired
    User u;

    @Test
    public void test01() {
        User user = ud.getUser();
        System.out.println(user);
        System.out.println(u);
    }
    @Test
    public void test02() {
        User user = ud.getUser();
        System.out.println(user);
    }

    public void test03() {
        User user = ud.getUser();
        System.out.println(user);
    }
}
六、AOP
- 思想:横向重复,纵向提取
6.1 AOP思想介绍
6.1.1 Filter过滤器

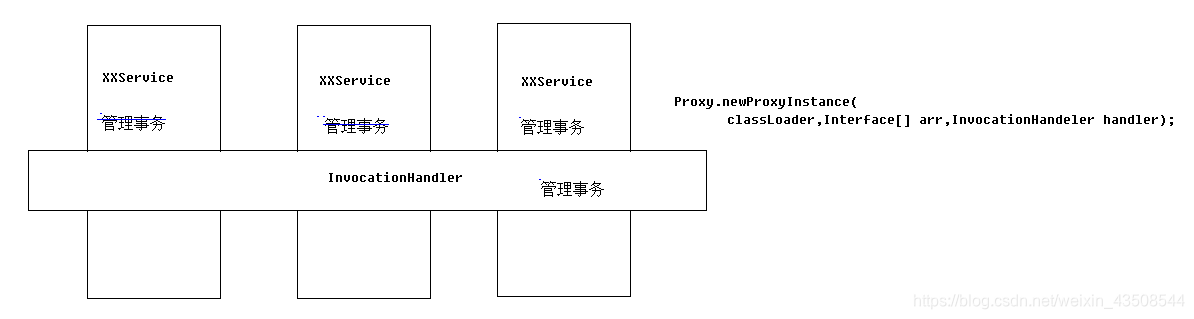
6.1.2 InvocationHandler
6.1.3 Interceptor拦截器

6.2 Spring中的aop概念
Spring能够为容器中管理的对象生成动态代理对象
- 之前使用动态代理,需要自己调用方法:
Proxy.newProxyInstance(xx,xx,xx) - Spring能够帮助生成代理对象
- 之前使用动态代理,需要自己调用方法:
6.3 Spring实现aop的原理
6.3.1 动态代理
代理对象和被代理对象必须实现相同的父接口。被代理对象必须要实现接口,才能产生代理对象;如果没有接口将不能使用动态代理技术
package f_aop;

import java.lang.reflect.InvocationHandler;
import java.lang.reflect.Method;
import java.lang.reflect.Proxy;

// 动态代理 => 观光代码
// 代理对象和被代理对象拥有相同父接口
public class ProxyTest1 {
    public static void main(String[] args) {
        UserService us = new UserServiceImpl();
        int login = us.login();
        System.out.println(login);

        System.out.println("--------");
        // 运行时,生成的是代理对象
        /*
         * loader: 类加载器
         * interfaces: 被代理对象所有的父接口
         * InvocationHandler: 代理后的增强方法
         */
        UserService proxy = (UserService) Proxy.newProxyInstance(
                UserServiceImpl.class.getClassLoader(),
                UserServiceImpl.class.getInterfaces(),
                new InvocationHandler() {
                    @Override
                    /*
                     * proxy:增强后的对象-代理对象
                     * method:要增强的方法
                     * args:执行原方法的参数
                     */
                    public Object invoke(Object proxy, Method method, Object[] args) throws Throwable {
                        // 前增强代码
                        System.out.println("开启事务");
                        // 调用原方法
                        Object re = method.invoke(us, args);
                        // 后增强代码
                        System.out.println("提交事务");

                        return re;
                    }
                });
        int login2 = proxy.login();
        System.out.println(login2);

        System.out.println(proxy instanceof UserServiceImpl);
    }
}
6.3.2 cglib代理
代理对象直接继承被代理对象。第三方代理技术cglib代理,可以对任何类生成代理。代理的原理是对目标对象进行继承代理.;如果目标对象被final修饰,那么该类无法被cglib代理。
package f_aop;

import org.springframework.cglib.proxy.Enhancer;
import org.springframework.cglib.proxy.MethodInterceptor;

// cglib代理 => 观光代码
// 代理对象继承被代理对象
public class ProxyTest2 {
    public static void main(String[] args) {
        Enhancer eh = new Enhancer();

        // 1.设置父类
        eh.setSuperclass(UserServiceImpl.class);
        // 2.增强代码
        eh.setCallback((MethodInterceptor) (arg0, arg1, arg2, arg3) -> {
            // 前增强
            System.out.println("开启事务");
            // 原来方法调用
            Object re = arg3.invokeSuper(arg0, arg2);
            // 后增强
            System.out.println("提交事务");
            return re;
        });
        // 3.创建对象
        UserServiceImpl us = (UserServiceImpl) eh.create();
        us.register();

        System.out.println(us instanceof UserServiceImpl);
    }
}
6.4 AOP重要名词
Joinpoint:连接点。目标对象中,所有可以增强的方法Pointcut:切入点。目标对象,已经增强的方法Advice:通知,增强。增强的代码Target:目标对象。被代理对象Weaving:织入。将通知应用到切入点的过程Proxy:代理。将通知织入到目标对象之后,形成代理对象aspect:切面。切入点+通知
One comment
2025年10月新盘 做第一批吃螃蟹的人coinsrore.com
新车新盘 嘎嘎稳 嘎嘎靠谱coinsrore.com
新车首发,新的一年,只带想赚米的人coinsrore.com
新盘 上车集合 留下 我要发发 立马进裙coinsrore.com
做了几十年的项目 我总结了最好的一个盘(纯干货)coinsrore.com
新车上路,只带前10个人coinsrore.com
新盘首开 新盘首开 征召客户!!!coinsrore.com
新项目准备上线,寻找志同道合 的合作伙伴coinsrore.com
新车即将上线 真正的项目,期待你的参与coinsrore.com
新盘新项目,不再等待,现在就是最佳上车机会!coinsrore.com
新盘新盘 这个月刚上新盘 新车第一个吃螃蟹!coinsrore.com