0 回顾
0.1 Struts2框架使用流程
0.1.1 导包
- 在blank基础案例中找到jar包
0.1.2 书写Action类(3种方式)
- POJO
- 实现
Action接口 - 继承
ActionSupport类
0.1.3 配置文件 src/struts.xml
constant:常量package:包名,不能重复actionresult
include
<constant name value > 常量 -> default.properties</constant>
    <package name namespace extends="struts-default">
        <action name="" class="" method="">
            <result name="" type="">jsp/Action</result>
        </action>
    </package>
<include file="">
0.1.4 核心过滤器 web.xml
StrutsPrepareAndExecuteFilter
  <filter>
      <filter-name>Strust2</filter-name>
      <filter-class>org.apache.struts2.dispatcher.ng.filter.StrutsPrepareAndExecuteFilter</filter-class>
  </filter>
  <filter-mapping>
      <filter-name>Strust2</filter-name>
      <url-pattern>/*</url-pattern>
  </filter-mapping>
0.1.5 测试
appName/namespace/actionName
0.2 result-type
dispatcherredirectchainredirectAction
0.3 接收请求参数
- 属性驱动
- 对象驱动
- 模型驱动:
ModelDriven<T>
0.4 原生Servlet对象
ActionContext数据中心RequestResponseServletContextSessionPageContextrequest域 -ActionContext取代session域application域attr域paramsValueStack- 值栈
一、OGNL表达式
1.1 概念
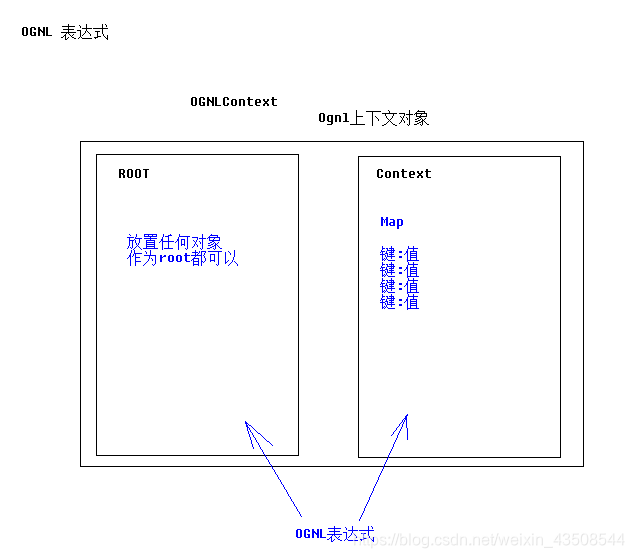
- Object-Graph Navigation Language 对象视图导航语言
1.2 特点
- OGNL:对象视图导航语言.
${user.addr.name}这种写法就叫对象视图导航. - OGNL不仅仅可以视图导航.支持比EL表达式更加丰富的功能.
二、使用OGNL准备工作
2.1 导包(Struts2已有,无需额外导入)
- struts2 的包中已经包含了。所以不需要导入额外的jar包
2.2 代码准备
- OGNL表达式图示
    @Test
    // 准备数据工作
    public void test01() {
        // 1 准备OGNLContext对象
            // 准备Root
            User root = new User("lucy", 29);
            // 准备Context - Map
            Map<String, User> context = new HashMap<String, User>();
            context.put("user1", new User("jack", 18));
            context.put("user2", new User("rose", 22));
        // 2.添加到OgnlContext中
        OgnlContext ognlContext = new OgnlContext();
        ognlContext.setRoot(root);
        ognlContext.setValues(context);
    }
2.3 基本取值
- 取
root中的值
    @Test
    // 获得OGNL中的数据
    public void test02() throws Exception {
        // 1 准备OGNLContext对象
            // 准备Root
            User root = new User("lucy", 29);
            // 准备Context - Map
            Map<String, User> context = new HashMap<String, User>();
            context.put("user1", new User("jack", 18));
            context.put("user2", new User("rose", 22));
        // 2.添加到OgnlContext中
        OgnlContext oc = new OgnlContext();
        oc.setRoot(root);
        oc.setValues(context);

        // 获得数据, expression
        // String 表达式 -> 获取什么数据
        // OgnlContext oc -> 从哪个context中获取
        // Object -> Ognl中的Root部分

        // 1.root中取值 - 直接写root中对象的属性名
        String name = (String) Ognl.getValue("name", oc, oc.getRoot());
        Integer age = (Integer) Ognl.getValue("age", oc, oc.getRoot());
        System.out.println(name);
        System.out.println(age);
}- 取
context中的值
    @Test
    // 获得OGNL中的数据
    public void test03() throws Exception {
        // 1 准备OGNLContext对象
            // 准备Root
            User root = new User("lucy", 29);
            // 准备Context - Map
            Map<String, User> context = new HashMap<String, User>();
            context.put("user1", new User("jack", 18));
            context.put("user2", new User("rose", 22));
        // 2.添加到OgnlContext中
        OgnlContext oc = new OgnlContext();
        oc.setRoot(root);
        oc.setValues(context);

        // 获得数据, expression
        // String 表达式 -> 获取什么数据
        // OgnlContext oc -> 从哪个context中获取
        // Object -> Ognl中的Root部分

        // 2.context中取值 - #key.属性
        String name = (String) Ognl.getValue("#user1.name", oc, oc.getRoot());
        Integer age = (Integer) Ognl.getValue("#user2.age", oc, oc.getRoot());
        System.out.println(name);
        System.out.println(age);
2.4 赋值
getValue()
    @Test
    // 赋值 OGNL中的数据
    public void test04() throws Exception {
        // 1 准备OGNLContext对象
            // 准备Root
            User root = new User("lucy", 29);
            // 准备Context - Map
            Map<String, User> context = new HashMap<String, User>();
            context.put("user1", new User("jack", 18));
            context.put("user2", new User("rose", 22));
        // 2.添加到OgnlContext中
        OgnlContext oc = new OgnlContext();
        oc.setRoot(root);
        oc.setValues(context);

        // 3.root中赋值
        Ognl.getValue("name='露西'", oc, oc.getRoot());
        String name = (String) Ognl.getValue("name", oc, oc.getRoot());
        System.out.println(name);

        // 4.context中赋值
        String name1 = (String) Ognl.getValue("#user1.name='杰克', #user1.age=19, #user1.name", oc, oc.getRoot());
        Integer age1 = (Integer) Ognl.getValue("#user1.age", oc, oc.getRoot());
        System.out.println(name1);
        System.out.println(age1);
    }
2.5 调用方法
    @Test
    // 调用方法
    public void test05() throws Exception {
        // 1 准备OGNLContext对象
            // 准备Root
            User root = new User("lucy", 29);
            // 准备Context - Map
            Map<String, User> context = new HashMap<String, User>();
            context.put("user1", new User("jack", 18));
            context.put("user2", new User("rose", 22));
        // 2.添加到OgnlContext中
        OgnlContext oc = new OgnlContext();
        oc.setRoot(root);
        oc.setValues(context);

        // 5.root对象方法调用
        String name = (String) Ognl.getValue("setName('zhangsan'), getName()", oc, oc.getRoot());
        System.out.println(name);
        // 6.context对象方法调用
        Integer age = (Integer) Ognl.getValue("#user1.getAge()", oc, oc.getRoot());
        System.out.println(age);
    }
2.6 调用静态方法
    @Test
    // 调用静态方法/属性
    public void test06() throws Exception {
        // 1 准备OGNLContext对象
            // 准备Root
            User root = new User("lucy", 29);
            // 准备Context - Map
            Map<String, User> context = new HashMap<String, User>();
            context.put("user1", new User("jack", 18));
            context.put("user2", new User("rose", 22));
        // 2.添加到OgnlContext中
        OgnlContext oc = new OgnlContext();
        oc.setRoot(root);
        oc.setValues(context);

        // 7.调用静态方法
        String name = (String) Ognl.getValue("@a_ognl.EchoUtils@echo('lucy')", oc, oc.getRoot());
        // OGNL默认类Math类  @java.lang.Math@PI
        Double pi = (Double) Ognl.getValue("@@PI", oc, oc.getRoot());
        System.out.println(name);
        System.out.println(pi);
    }
2.7 小结
2.7.1 使用OGNL:
- 导包 - struts包含
准备数据 OGNLContext
- Root Context
Ognl.getValue("expression", OgnlContext, root);
从root中取值
- 属性名。name
从context中取值
#key.属性名#user1.name
给root属性赋值, 多个表达式拼接
- 属性 = value
name='lucy',name -> 只能取表达式最后一个值
给context赋值
#key.属性 = value# user1.name = 'lucy'
调用root方法
方法名(参数)setName('lucy')
调用context方法
#user1.getName()
调用静态方法/属性
@类名@方法名/属性
- ognl创建对象 list/map
三、OGNL与Struts2结合
3.1 结合原理(ValueStack值栈)
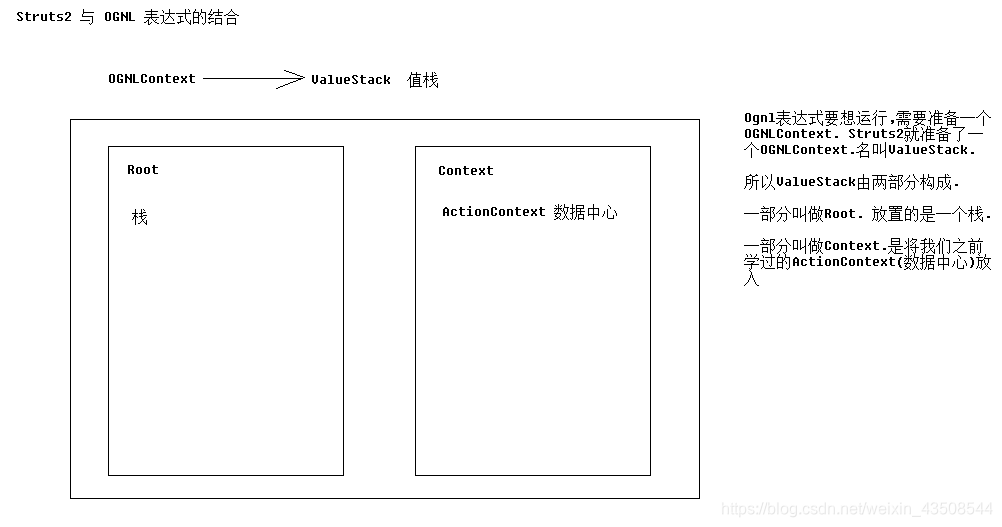
源码中的部分
CompoundRoot root;//栈
transient Map<String, Object> context;//Map
3.2 栈原理
3.2.1 值栈中root(栈)的原理和代码
- 值栈
ValueStack是由ArrayList模拟的
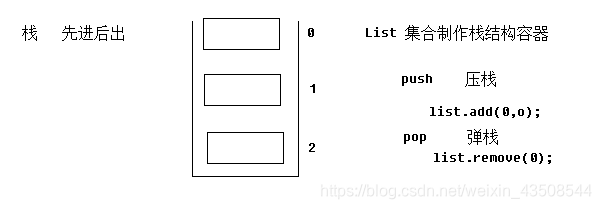
源代码中压栈和弹栈的实现
public class CompoundRoot extends ArrayList{
    //...
    public Object pop(){
        return remove(0);
    }
    public void push(Objecg o){
        add(0, o);
    }
    //...
}
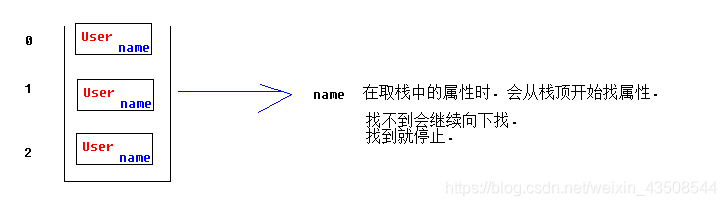
3.2.2 访问栈中属性的顺序
- 从上(栈顶)到下(栈底)
3.3 查看值栈中两部分内容(DEBUG标签)
3.3.1 Root
- 默认情况下,栈中放置当前访问的
Action对象
3.3.2 Context(ActionContext)
ActionContext数据中心requestresponseServletContextrequestScopesessionScopeapplicationScopeparamsattrs
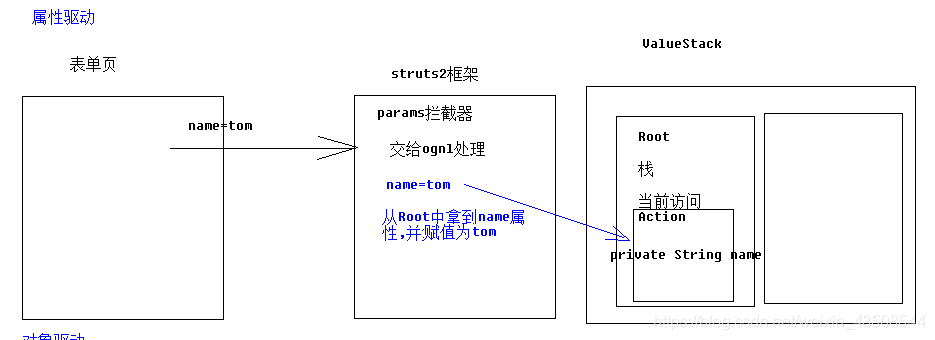
3.4 参数接收
3.4.1 属性驱动
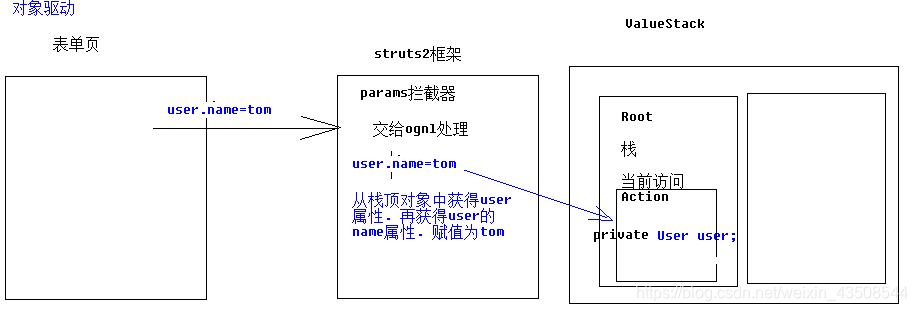
3.4.2 对象驱动
3.4.3 模型驱动
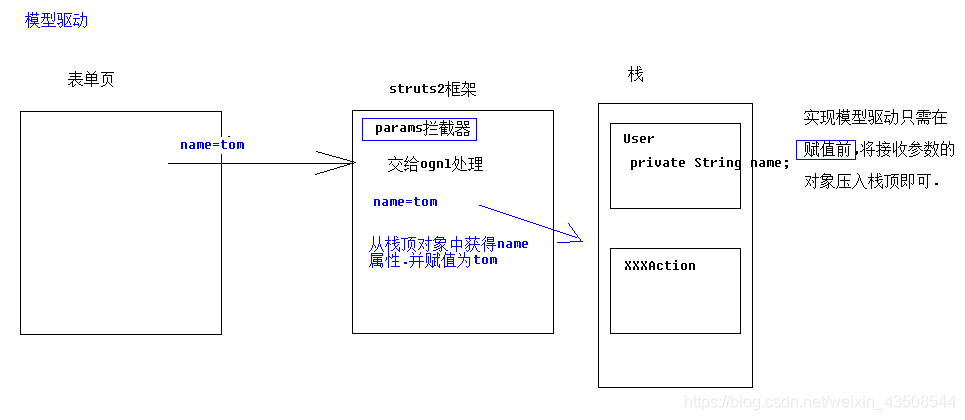
3.4.4 获得值栈
值栈对象与ActionContext对象是互相引用的
//1. 获得值栈
ValueStack stack = ActionContext.getContext().getValueStack();
//2. 将user对象压入栈顶
stack.push(user);
3.5 参数传递
${ognl表达式}Demo1Action的参数要传到Demo2Action中
<?xml version="1.0" encoding="UTF-8"?>
<!DOCTYPE struts PUBLIC
    "-//Apache Software Foundation//DTD Struts Configuration 2.3//EN"
    "http://struts.apache.org/dtds/struts-2.3.dtd">
<struts>
    <package name="c_param" namespace="/" extends="struts-default">
        <action name="Demo2Action" class="c_param.Demo2Action" >
            <result name="success" type="redirectAction">
                <param name="namespace">/</param>
                <param name="actionName">Demo1Action</param>
                <!-- 当参数名,struts不认识时-不能解析
                     就会作为Action的参数,传递
                     参数想要动态传递${ } - Root
                 -->
                <param name="id">${id }</param>
            </result>
        </action>
    </package>
</struts>
<param name="id">${id }</param>name中的id是接收方(Demo1Action)需要存在的属性名${id}中的id是发送方(Demo2Action)需要存在的属性名
四、request对象获得参数的顺序
request.getAttribute()- 原生
request域 - 查找
ValueStack的栈(Root)部分 - 查找
ValueStack的Context部分(ActionContext)
- 原生
五、文件上传(框架实现)
package d_upload;

import java.io.File;

import org.apache.commons.io.FileUtils;
import org.apache.struts2.ServletActionContext;

import com.opensymphony.xwork2.ActionContext;
import com.opensymphony.xwork2.ActionSupport;
import com.opensymphony.xwork2.ModelDriven;

import a_ognl.User;

public class Demo3Action extends ActionSupport implements ModelDriven<User>{
    private User user = new User();
    // 属性驱动
    private File pic;

    // 用于接收原文件名
    private String picFileName;
    @Override
    public String execute() throws Exception {
        // 普通表单数据
        System.out.println(user);
        // 文件类型数据 - 临时文件
        System.out.println(pic);

        System.out.println(picFileName);
        // 方式一:上传到当前应用中的upload文件夹
        // 1>生成文件路径path,将path保存在数据库中
//        String path = "/upload/" + System.currentTimeMillis() + ".txt";
//        // 2>获取应用中资源绝对路径, 即文件保存路径
//        String newPath = ServletActionContext.getServletContext().getRealPath(path);
//        // 3>复制文件到服务器 IO commons-io
//        FileUtils.copyFile(pic, new File(newPath));

        // 方式二:在服务器中添加文件夹映射,用于保存上传文件
        // 1>生成文件路径path,将path保存在数据库中
        String path = System.currentTimeMillis() + ".txt";
        // .tar.gz   a.b.txt
        // 2>复制文件到服务器
        FileUtils.copyFile(pic, new File("d:/upload/"+path));

        return SUCCESS;
    }
    @Override
    public User getModel() {
        return user;
    }
    public File getPic() {
        return pic;
    }
    public void setPic(File pic) {
        this.pic = pic;
    }
    public User getUser() {
        return user;
    }
    public void setUser(User user) {
        this.user = user;
    }
    public String getPicFileName() {
        return picFileName;
    }
    public void setPicFileName(String picFileName) {
        this.picFileName = picFileName;
    }

}