1 Ribbon
1.1 介绍
- Ribbon是Netflix公司开源的一个负载均衡的项目(https://github.com/Netflix/ribbon),它是一个基于HTTP、TCP的客户端负载均衡器。
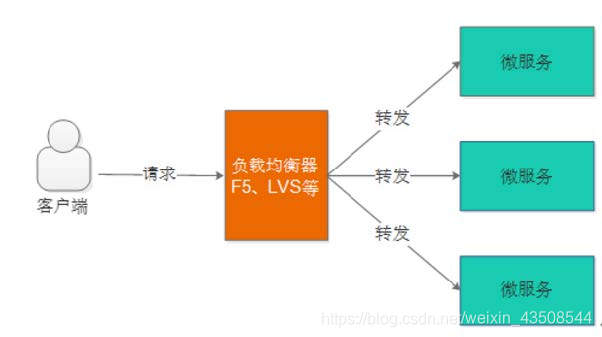
1.1.1 什么是负载均衡
- 负载均衡是微服务架构中必须使用的技术,通过负载均衡来实现系统的高可用、集群扩容等功能。负载均衡可通过硬件设备及软件来实现,硬件比如:F5、Array等,软件比如:LVS、Nginx等。
- 用户请求先到达负载均衡器(也相当于一个服务),负载均衡器根据负载均衡算法将请求转发到微服务。负载均衡算法有:轮训、随机、加权轮训、加权随机、地址哈希等方法,负载均衡器维护一份服务列表,根据负载均衡算法将请求转发到相应的微服务上,所以负载均衡可以为微服务集群分担请求,降低系统的压力。
1.1.2 什么是客户端负载均衡
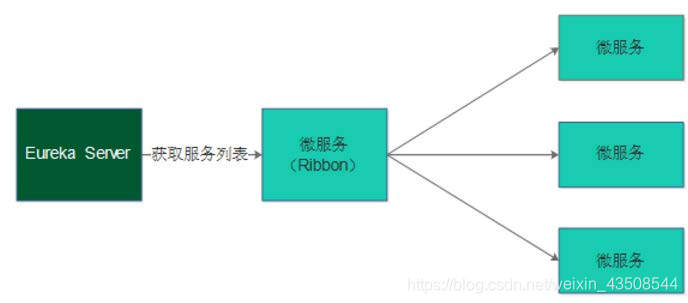
上图是服务端负载均衡,客户端负载均衡与服务端负载均衡的区别在于客户端要维护一份服务列表,Ribbon从
Eureka Server获取服务列表,Ribbon根据负载均衡算法直接请求到具体的微服务,中间省去了负载均衡服务。- 在消费微服务中使用Ribbon实现负载均衡,Ribbon先从
Eureka Server中获取服务列表。 - Ribbon根据负载均衡的算法去调用微服务。
- 在消费微服务中使用Ribbon实现负载均衡,Ribbon先从
1.2 代码测试
- Spring Cloud引入Ribbon配合
restTemplate实现客户端负载均衡
1.2.1 添加依赖
<dependency>
    <groupId>org.springframework.cloud</groupId>
    <artifactId>spring-cloud-starter-ribbon</artifactId>
    <version>1.3.5.RELEASE</version>
</dependency>
<dependency>
    <groupId>com.squareup.okhttp3</groupId>
    <artifactId>okhttp</artifactId> <!--出现Unknown,指定一下version-->
</dependency>
1.2.2 application.yml添加ribbon参数
server:
  port: 31200
spring:
  application:
    name: xc-service-manage-course
  datasource:
    druid:
      url: jdbc:mysql://localhost:3306/xc_course?characterEncoding=utf-8
      username: root
      password: root
      driverClassName: com.mysql.jdbc.Driver
      initialSize: 5  #初始建立连接数量
      minIdle: 5  #最小连接数量
      maxActive: 20 #最大连接数量
      maxWait: 10000  #获取连接最大等待时间,毫秒
      testOnBorrow: true #申请连接时检测连接是否有效
      testOnReturn: false #归还连接时检测连接是否有效
      timeBetweenEvictionRunsMillis: 60000 #配置间隔检测连接是否有效的时间(单位是毫秒)
      minEvictableIdleTimeMillis: 300000  #连接在连接池的最小生存时间(毫秒)
pagehelper:
  helper-dialect: mysql
eureka:
  client:
    register-with-eureka: true #服务注册开关
    fetch-registry: true #服务发现开关
    service-url: #Eureka客户端与Eureka服务端进行交互的地址,多个中间用逗号分隔
      defaultZone: ${EUREKA_SERVER:http://localhost:50101/eureka/,http://localhost:50102/eureka/}
  instance:
    prefer-ip-address: true #将自己的ip注册到Eureka服务中
    ip-address: ${IP_ADDRESS:127.0.0.1}
    instance-id: ${spring.application.name}:${server.port} #指定实例Id
ribbon:
  MaxAutoRetries: 2 #最大重试次数,当Eureka中可以找到服务,但是服务连不上时将会重试
  MaxAutoRetriesNextServer: 3 #切换实例的重试次数
  OkToRetryOnAllOperations: false #对所有操作请求都进行重试,如果是get则可以,如果是post,put等操作没有实现幂等的情况下时很危险的,所以设置为false
  ConnectTimeout: 5000 #请求连接的超时时间
  ReadTimeout: 6000  #请求处理的超时时间
1.2.3 在启动类中创建RestTemplate
- 开启
@LoadBalanced注解

package com.xuecheng.manage_course;

import org.springframework.boot.SpringApplication;
import org.springframework.boot.autoconfigure.SpringBootApplication;
import org.springframework.boot.autoconfigure.domain.EntityScan;
import org.springframework.cloud.client.discovery.EnableDiscoveryClient;
import org.springframework.cloud.client.loadbalancer.LoadBalanced;
import org.springframework.cloud.openfeign.EnableFeignClients;
import org.springframework.context.annotation.Bean;
import org.springframework.context.annotation.ComponentScan;
import org.springframework.http.client.OkHttp3ClientHttpRequestFactory;
import org.springframework.web.client.RestTemplate;

@EnableFeignClients //开启feignClient的支持
@EnableDiscoveryClient //一个EurekaClient从EurekaServer发现服务
@SpringBootApplication
@EntityScan("com.xuecheng.framework.domain.course")//扫描实体类
@ComponentScan(basePackages={"com.xuecheng.api"})//扫描接口
@ComponentScan(basePackages={"com.xuecheng.manage_course"})
@ComponentScan(basePackages={"com.xuecheng.framework"})//扫描common下的所有类
public class ManageCourseApplication {
    public static void main(String[] args) throws Exception {
        SpringApplication.run(ManageCourseApplication.class, args);
    }

    @Bean
    @LoadBalanced //开启负载均衡
    public RestTemplate getRestTemplate() {
        return new RestTemplate(new OkHttp3ClientHttpRequestFactory());
    }
}
1.2.4 启动2个cms服务
- 注意端口要不一致

1.2.5 test代码
@SpringBootTest
@RunWith(SpringRunner.class)
public class TestRibbon {
    @Autowired
    RestTemplate restTemplate;

    @Test
    public void testRibbon() {
        //确定要获取的服务名称
        String serviceId = "XC-SERVICE-MANAGE-CMS";//服务名为eureka中的instance-id
        //ribbon客户端从eurekaServer中获取服务列表 ,根据服务名获取服务列表
        for (int i = 0; i < 10; i++) { //LoadBalancerInterceptor 进行负载均衡算法
            ResponseEntity<Map> entity = restTemplate.getForEntity("http://"+serviceId+"/cms/page/get/5a754adf6abb500ad05688d9", Map.class);
            Map body = entity.getBody();
            System.out.println(body);
        }
    }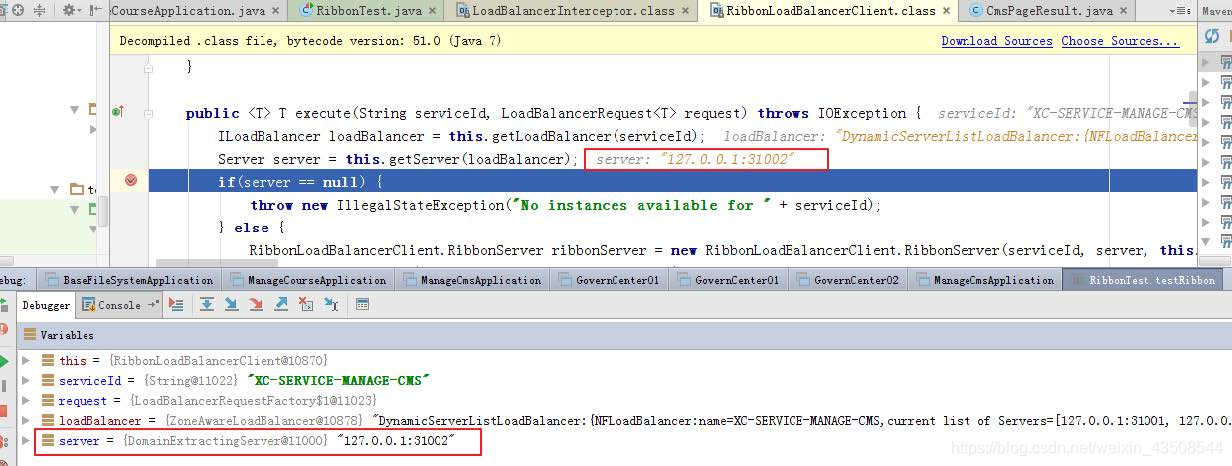
}- 添加
@LoadBalanced注解后,restTemplate会走LoadBalancerInterceptor拦截器,此拦截器中会通过RibbonLoadBalancerClient查询服务地址,可以在此类打断点观察每次调用的服务地址和端口,两个cms服务会轮流被调用。
2 Feign
2.1 介绍
- Feign是Netflix公司开源的轻量级rest客户端,使用Feign可以非常方便的实现Http 客户端。Spring Cloud引入Feign并且集成了Ribbon实现客户端负载均衡调用。
2.2 测试
2.2.1 微服务中添加依赖
<dependency>
    <groupId>org.springframework.cloud</groupId>
    <artifactId>spring-cloud-starter-openfeign</artifactId>
</dependency>
<dependency>
    <groupId>com.netflix.feign</groupId>
    <artifactId>feign-okhttp</artifactId>
</dependency>
2.2.2 定义FeignClient接口
- 参考Swagger文档定义
FeignClient,注意接口的Url、请求参数类型、返回值类型与Swagger接口一致。在课程管理服务中创建client包,定义查询cms页面的客户端该用接口,
package com.xuecheng.manage_course.client;

import com.xuecheng.framework.domain.cms.CmsPage;
import org.springframework.cloud.openfeign.FeignClient;
import org.springframework.web.bind.annotation.GetMapping;
import org.springframework.web.bind.annotation.PathVariable;

@FeignClient(value = "XC-SERVICE-MANAGE-CMS") //指定远程调用的服务名
public interface CmsPageClient {
    //根据页面Id查询页面信息,远程调用cms请求数据
    @GetMapping("/cms/page/get/{id}") //用GetMapping标识远程调用的http的方法类型
    public CmsPage findCmsPageById(@PathVariable("id") String id);
}
2.2.3 启动类添加@EnableFeignClients注解
@EnableFeignClients
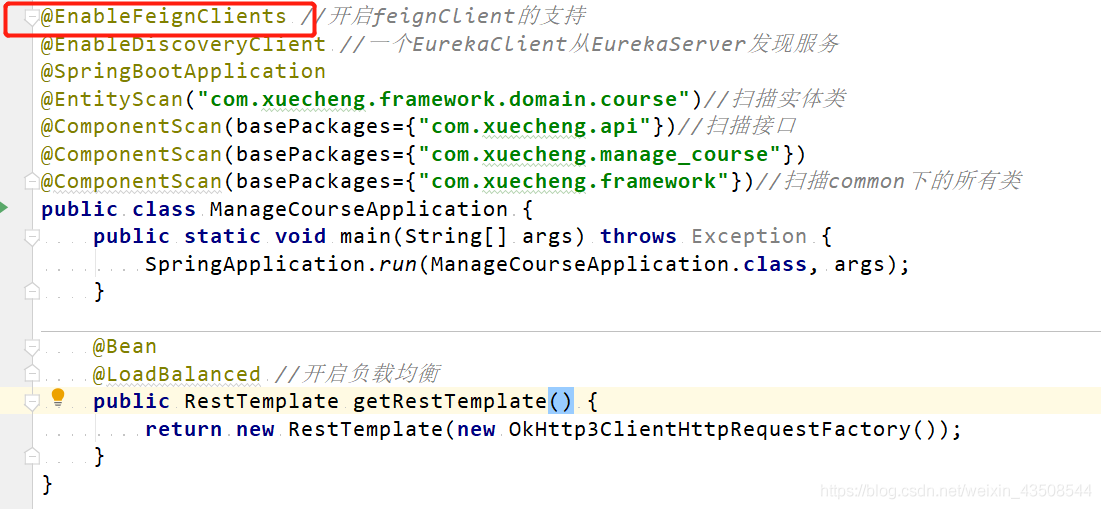
@EnableFeignClients //开启feignClient的支持
@EnableDiscoveryClient //一个EurekaClient从EurekaServer发现服务
@SpringBootApplication
@EntityScan("com.xuecheng.framework.domain.course")//扫描实体类
@ComponentScan(basePackages={"com.xuecheng.api"})//扫描接口
@ComponentScan(basePackages={"com.xuecheng.manage_course"})
@ComponentScan(basePackages={"com.xuecheng.framework"})//扫描common下的所有类
public class ManageCourseApplication {
    public static void main(String[] args) throws Exception {
        SpringApplication.run(ManageCourseApplication.class, args);
    }

    @Bean
    @LoadBalanced //开启负载均衡
    public RestTemplate getRestTemplate() {
        return new RestTemplate(new OkHttp3ClientHttpRequestFactory());
    }
}
2.2.4 测试
@SpringBootTest
@RunWith(SpringRunner.class)
public class TestFeign {
    @Autowired
    CmsPageClient cmsPageClient;//接口代理对象,由Feign生成代理对象

    @Test
    public void testRibbon() {
        //发起远程调用
        CmsPage cmsPage = cmsPageClient.findCmsPageById("5a754adf6abb500ad05688d9");
        System.out.println(cmsPage);
    }
}
2.3 原理
- 启动类添加
@EnableFeignClients注解,Spring会扫描标记了@FeignClient注解的接口,并生成此接口的代理对象 @FeignClient(value = XcServiceList.XC_SERVICE_MANAGE_CMS)即指定了cms的服务名称,Feign会从注册中心获取cms服务列表,并通过负载均衡算法进行服务调用。- 在接口方法 中使用注解
@GetMapping("/cms/page/get/{id}"),指定调用的url,Feign将根据url进行远程调用。